- Home
- >
- Knowledge Center
- >
- Blogs
Blogs
Sharing knowledge is key to an innovative and healthy industry! This knowledge center is therefore a central place on our website to share information. Read all about our industry in the blogs below!
How to Make Freeze Dried Skittles at Home?
Creating your own Freeze Dried Skittles at home can be an exciting project. This process allows you to transform the chewy candy into a crunchy, flavorful treat. Imagine the vibrant colors and bold flavors of Skittles reimagined with a delightful texture. It's a fun way to enjoy a nostalgic snack.
You'll need a few essential tools. A freeze dryer is the star of this process. If you don't have one, you might consider borrowing or renting it. The adventure begins when you arrange the Skittles in the freeze dryer trays. Timing and temperature are crucial. Watch closely as the candy transforms. You may face challenges along the way.
Experimenting is part of the journey. The results may not be perfect at first. Sometimes, they might end up too crumbly or lose some flavor. Don’t be discouraged. Each attempt teaches you something new. With a little patience, your homemade Freeze Dried Skittles will be worth the effort. Enjoy the process and the unique results!
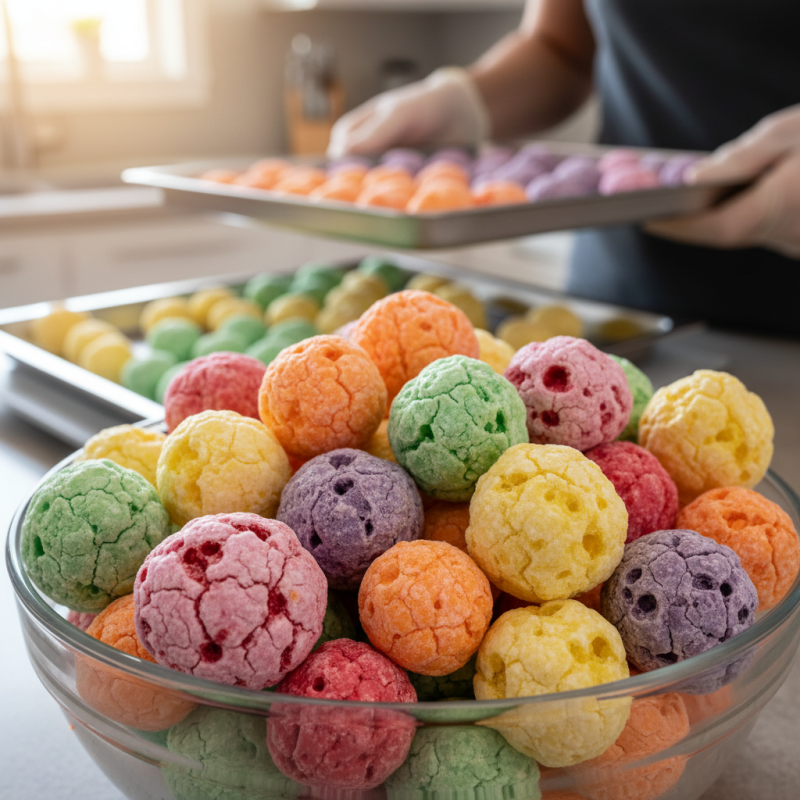
Selecting the Right Equipment for Freeze Drying Skittles
When selecting equipment for freeze-drying Skittles at home, the freeze dryer is crucial. A compact home freeze dryer is a good option. These devices can remove moisture effectively. They are available in various sizes. Ensure it fits your kitchen space.
Consider a vacuum sealer too. It helps preserve the freshness of your freeze-dried Skittles. A good sealer creates an airtight environment. It prevents moisture from re-entering. Also, a dehydrator can be a backup if needed. It won't freeze dry completely, but it's a start.
Tips: Always clean your equipment before use. This reduces contamination risk. Test a small batch first. Adjusting time and settings can lead to better results. Keep an eye on the Skittles; don’t let them over-dry. This can change their texture. Experiment and learn from each batch. Each attempt offers new insights into the freeze-drying process.
Preparing Skittles for the Freeze Drying Process
Preparing Skittles for the freeze drying process requires attention to detail. Start with a clean workspace. Gather your Skittles and equipment. You'll need a freeze dryer, which can be a significant investment. According to industry reports, freeze drying machines can range from a few hundred to several thousand dollars, depending on capacity and features.
Next, sort the Skittles by color. This adds a visual appeal to the final product. Place them in a single layer on the trays. Avoid overlapping; this ensures that each piece dries evenly. Skittles contain about 2% moisture. During freeze drying, this moisture is removed without altering the flavor or texture. The process can take anywhere from 24 to 48 hours, depending on the machine.
It's crucial to monitor the process. Sometimes, Skittles may not dry completely. If that's the case, consider adjusting the temperature or time. Additionally, some flavors might freeze dry better than others. Conducting small test batches could save time and effort. Each type of Skittle may yield a different texture, impacting the overall experience.
Step-by-Step Guide to Freeze Drying Skittles at Home
Freeze drying Skittles at home is a fun and creative process. This method removes moisture while maintaining flavor and color. Studies show that freeze-dried foods can retain up to 97% of their nutrients. This makes them an excellent choice for snacking or storing for future use.
Start by preparing your Skittles. Arrange them on a tray in a single layer. Make sure they do not touch each other. This allows for even freeze drying. Place the tray in your freeze dryer. The process may take 24 hours depending on your machine. Check back to see if they’ve reached the desired crunchiness.
**Tip:** Use a vacuum seal to store your freeze-dried Skittles. This keeps them fresh longer. Be aware that not every batch will come out perfect. Some might be too chewy or lose color. Don't let that discourage you; it’s part of the learning process. Experimenting with different settings can lead to better results in the future.
Storing and Enjoying Your Homemade Freeze-Dried Skittles
Storing your homemade freeze-dried Skittles is crucial for maintaining their delightful flavor and texture. Start by placing them in airtight containers. Glass jars or vacuum-sealed bags work well. Ensure that they are completely dry before storage. Moisture can ruin their unique crunch.
Enjoying your freeze-dried Skittles can be an adventure. They can transform your favorite flavors into a crispy treat. Pair them with yogurt or add them to trail mix for a fun twist. You might find that some flavors work better than others. Keep experimenting! It’s a bit of a trial-and-error process. Sometimes, you might not achieve the perfect crunch on your first try. That’s okay! It’s all part of the fun.
Tips and Troubleshooting for Successful Freeze Drying of Skittles
Freeze drying Skittles at home can be exciting but tricky. Here are some tips to enhance your experience.
Choose the right freeze dryer. Not all models perform the same. A reliable machine makes a difference in the quality of your Skittles. Ensure your Skittles are fresh. Stale or old candies might not freeze dry well. They can turn tough instead of light and crispy.
Once you place the candies in the freeze dryer, be patient. The process can take several hours. Check the progress occasionally. If they seem too sticky, they may need more time. If they feel hard but aren’t completely dry, you might want to extend the drying time.
Watch out for uneven drying. Some Skittles may not freeze dry the same way. Adjust the layout in the dryer. Spacing them out helps promote even airflow. It can be frustrating when some candies turn out perfect while others do not. Reflect on what changes you can make next time.